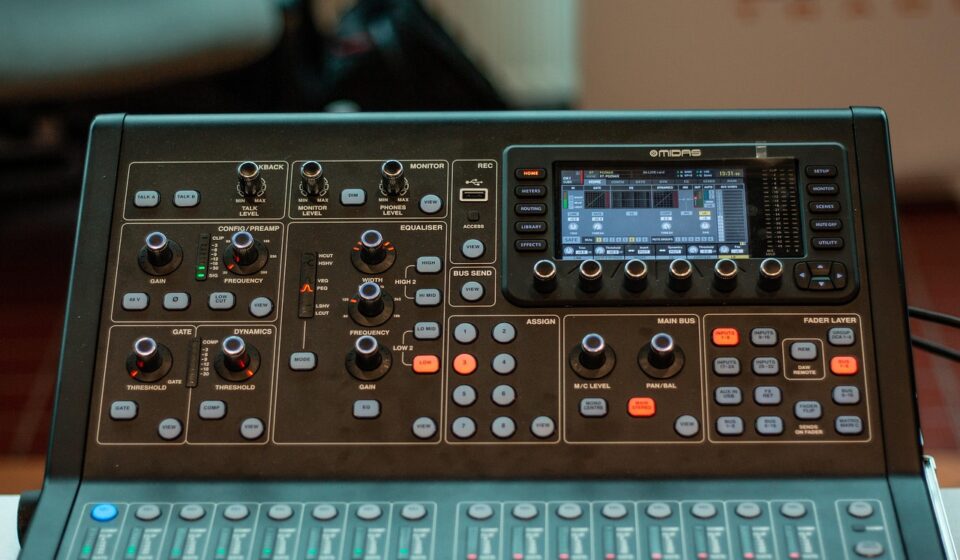
Have you ever listened to your favorite track or a crucial presentation and thought, “This just doesn’t sound right?” Perhaps the bass is overwhelming, or the voices feel thin and distant. These common audio frustrations often stem from an imbalance in sound frequencies—a problem a quad equalizer is perfectly designed to solve.
Key Takeaways
- A quad equalizer precisely adjusts four distinct frequency bands to balance audio.
- Both graphic and parametric quad EQs offer unique control methods for different use cases.
- Effective tuning involves strategic cuts and boosts, prioritizing clarity and avoiding harshness.
- Room acoustics significantly impact EQ effectiveness; listen critically in your actual environment.
- While powerful, a quad EQ has limitations, and sometimes a multi-band EQ is a better solution.
What Exactly is a Quad Equalizer?
A quad equalizer is an audio processing tool that allows you to adjust the volume levels of four specific frequency ranges, or “bands,” within an audio signal. Unlike simpler treble and bass controls, a quad EQ offers more granular manipulation, letting you sculpt the tonal balance of your sound with greater precision. It’s about carving out space for different elements in your audio mix or correcting acoustical deficiencies in a listening environment. The goal is to improve overall clarity, presence, and impact, making everything from music to spoken word sound better.
The Four Key Bands: Decoding the Audio Spectrum
Understanding the typical frequency ranges a quad equalizer targets is crucial for effective tuning. While specific crossover points can vary by model, these four bands usually cover distinct sonic territories:
1. Low Frequencies (Bass/Sub-Bass): Often ranging from 20 Hz to around 200 Hz. This band controls the depth and impact of your sound. Think kick drums, bass guitars, and the rumble of movie explosions. Boosting here adds warmth and power, but too much can lead to muddiness or boominess.
Last updated: August 28, 2026
2. Low-Mid Frequencies (Body/Warmth): Typically from 200 Hz to 1 kHz. This range is where the “body” of many instruments and vocals resides. Guitars, piano fundamentals, and the lower register of voices falls here. Adjustments can affect the fullness or thinness of a sound. I’ve found that pushing the 250 Hz band too hard often introduces a ‘boxy’ quality to vocals if not careful.
3. High-Mid Frequencies (Presence/Clarity): Generally spanning 1 kHz to 5 kHz. This is the crucial range for vocal clarity, instrument definition, and speech intelligibility. Too much boost can make sounds harsh or fatiguing, while cuts might make them sound distant or muffled. This band is key for ensuring vocals cut through a mix.
4. High Frequencies (Treble/Air): From 5 kHz up to 20 kHz. This band governs the brilliance, sparkle, and “airiness” of a sound. Cymbals, shimmering synths, and the crispness of sibilance are found here. Boosting can add detail and openness, but excessive amounts can introduce hiss or a piercing quality.
Graphic vs. Parametric Quad Equalizers: Which One for You?
When choosing a quad equalizer, you’ll primarily encounter two types: graphic and parametric. Each has its own strengths and control methods.
Graphic Equalizers: These provide fixed frequency bands with adjustable gain (volume) levels. Imagine a row of faders, each controlling a specific frequency range. They are intuitive and quick to use, making them popular for live sound reinforcement or home stereo systems where broad adjustments are often sufficient. A common example is the Mackie Quad EQ, which often features fixed bands for straightforward adjustments.
Parametric Equalizers: These offer more sophisticated control. For each of the four bands, you can adjust not only the gain but also the center frequency and the “Q” factor (bandwidth). The Q factor determines how wide or narrow the affected frequency range is.
A high Q affects a very narrow band, ideal for surgical cuts to remove specific resonances or feedback. A low Q affects a broader range, useful for shaping the overall tone. Parametric EQs are favored in studio environments or for precise problem-solving.
| Feature | Graphic Quad EQ | Parametric Quad EQ |
|---|---|---|
| Control Points | Fixed frequencies, variable gain | Variable frequency, gain, and Q |
| Ease of Use | High (visual faders) | Moderate to Low (more parameters) |
| Precision | Lower (broad adjustments) | Higher (surgical cuts possible) |
| Typical Use | Live sound, home audio, quick adjustments | Studio mixing, mastering, feedback removal |
| Learning Curve | Gentle | Steeper |
Pros and Cons of Using a Quad Equalizer
Pros
- Significantly improves audio clarity and balance.
- Corrects room acoustic issues and speaker deficiencies.
- Enhances specific elements (e.g., boosting vocals).
- Helps prevent feedback in live sound environments.
- Offers more control than basic tone knobs.
Cons
- Can introduce unwanted artifacts if over-adjusted.
- Requires a good understanding of audio frequencies.
- Limited bands compared to multi-band EQs for complex mixes.
- Parametric versions have a steeper learning curve.
- May not fully compensate for severe room problems.
How a Quad Equalizer Shapes Your Sound
The fundamental principle behind any equalizer, including a quad equalizer, is manipulating the amplitude (volume) of specific frequency bands. When you move a fader or turn a knob on an EQ, you’re either boosting (increasing) or cutting (decreasing) the energy within that frequency range. For instance, if a recording sounds too “thin,” I might gently boost the low-mid frequencies to add warmth and body. Conversely, if vocals are getting lost in a muddy bass, I’d cut some low-end frequencies to create more space. My advice is often to prioritize cutting over boosting. Excessive boosting can quickly lead to harshness, distortion, or an unnatural sound. Cuts, on the other hand, tend to sound more transparent and can effectively clean up a mix. Think of it as removing unwanted clutter rather than adding more elements.
Setting Up Your Quad Equalizer: A Step-by-Step Guide
Getting your quad equalizer properly integrated into your audio chain is the first step to better sound. Here’s how I typically approach it:
- Connect the EQ: For most home audio or live sound setups, the equalizer sits between your mixer/preamp and your amplifier. The output of your sound source (mixer, CD player, etc.) goes into the EQ’s input, and the EQ’s output connects to your amplifier’s input. Ensure all connections are secure and correctly labeled (left/right channels).
- Start Flat: Before making any adjustments, set all EQ bands to their neutral or “flat” position (usually 0 dB gain). Quad equalizer gives you a baseline to work from and helps you identify actual sonic issues rather than introducing new ones.
- Play Reference Audio: Use high-quality audio that you are very familiar with. This could be a well-mixed song, a clear vocal recording, or a specific piece of content you intend to optimize. Listen critically.
- Identify Problem Frequencies: Listen for specific issues: Is the bass too boomy? Are vocals harsh? Does the overall sound lack clarity? Once you pinpoint a problem, you can target the corresponding frequency band.
- Make Subtle Adjustments: Begin with small adjustments. A change of 1–3 dB can make a significant difference. Boost or cut a band slightly, then listen, then adjust again. Avoid drastic changes unless you’re addressing severe feedback.
- Listen in Context: Don’t make adjustments in isolation. Listen to how your changes affect the overall balance of the sound. Sometimes, a cut in one band can make another band sound better without needing a boost.
- Check Mono Compatibility: If you’re mixing, I always recommend checking your mix in mono occasionally. Sometimes, EQ adjustments that sound great in stereo can cause phase issues or cancellations when summed to mono, which is important for broadcast or older playback systems.
Practical Scenarios: Tuning for Music, Speech, and Gaming
The ideal quad equalizer settings depend entirely on the audio content and your listening environment. What works for a concert hall won’t work for a gaming headset.
For Music Listening: If your music sounds muddy, I’d suggest a slight cut in the 200-400 Hz range. If it lacks sparkle, a gentle boost around 8–10 kHz can add air. For powerful bass without boominess, try boosting at 60-80 Hz and slightly cutting around 250 Hz. Remember, every track is different, so adjust to taste.
For Speech and Podcasts: Clarity is paramount here. A slight boost in the 2-4 kHz range can enhance vocal presence, helping voices cut through background noise. I’d also consider a gentle roll-off (cut) below 100 Hz to remove unwanted rumble from microphones or room noise, as human speech doesn’t carry much information below that point. According to a 2018 study on speech intelligibility, the 2-4 kHz range is critical for consonant recognition, which significantly impacts how clearly speech is perceived (Source: American Speech-Language-Hearing Association).
For Gaming: This is where a quad EQ can be a major shift. For competitive gaming, you often want to emphasize footsteps and directional cues while reducing overwhelming explosions. I’d typically boost high-mids (2-4 kHz) for footsteps and cut some low-mids (200-500 Hz) to reduce environmental clutter. For cinematic gaming, a subtle bass boost (60-120 Hz) can enhance immersion, but keep it from drowning out dialogue.
Avoiding Common Quad EQ Mistakes
Even with good intentions, it’s easy to fall into common equalization pitfalls that can degrade your audio instead of improving it. Here are some mistakes I’ve often observed and how to avoid them:
- Over-Equalization: The most frequent mistake is making too many drastic changes. Subtle adjustments are often more effective than extreme boosts or cuts. If you find yourself pushing a band to its maximum, it might indicate a more fundamental problem with your source audio or speakers, not just an EQ issue.
- “Scooping” the Mids: This involves cutting the mid-range frequencies significantly to emphasize bass and treble. While popular in some genres, it often results in a hollow, unnatural sound where vocals and many instruments lose their presence and definition.
- Ignoring Room Acoustics: Your listening environment plays a massive role in how sound is perceived. What sounds balanced in a studio might sound boomy in a small, untreated room. Don’t EQ in a vacuum; listen in the actual space. For more on optimizing your listening space, explore.
- EQing Blindly: Relying solely on visual meters or pre-set numbers without critical listening is a recipe for poor sound. Trust your ears first and foremost. Every room and speaker setup is unique, so what works for one person’s “best settings” might not work for yours.
- Using EQ to Fix Bad Recordings: While a quad EQ can help mitigate minor issues, it can’t magically transform a poorly recorded or mixed track into a masterpiece. If the source material is fundamentally flawed, EQ can only do so much before introducing unwanted artifacts.
Beyond the Four Bands: When to consider More
While a quad equalizer is a powerful tool for general sound shaping and problem correction, it does have its limitations. The primary constraint is the number of bands. Four bands offer a good balance of control and simplicity, but complex audio mixes or severe acoustic issues might demand more. For instance, removing a very specific ringing resonance in a live venue might require a narrow cut at 1.7 kHz, which a fixed four-band graphic EQ might not precisely hit. In such cases, a fully parametric EQ with more bands (e.g., 7, 10, or even 31 bands per channel) offers the surgical precision needed. When you’re diving into detailed sound design or professional mixing, I would typically recommend exploring digital audio workstations (DAWs) with built-in multi-band parametric EQs. These offer unparalleled flexibility, often with visual spectrum analyzers that help you pinpoint problematic frequencies. For a deeper dive into advanced EQ techniques, you might find Unlock Visual Intelligence: Advanced Image Search Methods helpful.
Frequently Asked Questions
What’s the difference between a quad equalizer and a four-band EQ?
there’s no functional difference. “Quad equalizer” and “four-band EQ” refer to the same type of audio processing tool that allows you to adjust the volume of four distinct frequency ranges. The terms are often used interchangeably in the audio industry.
Can I use a quad equalizer with any audio system?
Most quad equalizers are designed to integrate with standard analog audio systems, connecting between your audio source (like a mixer or preamp) and your amplifier. Digital versions are also common in software or built into digital mixers, offering flexibility for various setups, from home theaters to professional studios.
Should I boost or cut frequencies with a quad equalizer?
As a general rule, I recommend starting with cuts rather than boosts. Cuts tend to sound more natural and clean up a mix more effectively by removing unwanted frequencies. Boosting too much can quickly lead to harshness, distortion, or an unnatural, fatiguing sound. Use boosts sparingly and subtly.
How do room acoustics affect quad equalizer settings?
Room acoustics significantly impact how you perceive sound, making EQ settings highly dependent on your environment. Walls, furniture, and room size can cause certain frequencies to be exaggerated or absorbed. What sounds balanced in one room might be boomy or thin in another, necessitating different EQ adjustments to compensate.
What are some good starting points for quad equalizer settings?
For a brighter sound, try a small boost around 8 kHz. For more vocal presence, a slight boost at 2–3 kHz often helps. To reduce muddiness, a gentle cut around 250 Hz can be effective. Always make small adjustments and trust your ears to find what sounds best for your specific audio and room.
When would a quad equalizer not be enough?
A quad equalizer might not be sufficient for highly complex audio mixing, professional mastering, or when dealing with very specific, narrow frequency issues like persistent feedback in a live setting. In these scenarios, a multi-band parametric equalizer with more control points and adjustable Q settings would be more appropriate.
Conclusion
A quad equalizer is an incredibly versatile tool for anyone looking to refine their audio experience. By understanding the four key frequency bands and practicing thoughtful adjustments, you can transform muddy, harsh, or unbalanced sound into something clear, rich, and engaging. Remember to listen critically, prioritize subtle cuts, and always consider your unique listening environment. With a bit of practice, you’ll be sculpting your sound like a pro in no time.
Information current as of August 2026; pricing and product details may change.